?Anyone get the ASN of the Truck that Hit Me?!?: Creating a PowerShell Function to Make 3rd Party API Calls for Extending Honeypot Information [Guest Diary]
[This is a Guest Diary by Chris Vucic, an ISC intern as part of the SANS.edu BACS program]
Introduction
For this blog post, after a mid-point conversation with the SANS team and mentors, I’ve decided to show how I go about creating a function in PowerShell to assist in sorting wheat from chaff in the process of rationalizing honeypot attackers, by modeling API calls in Postman.
What’s an API and how do I use it?
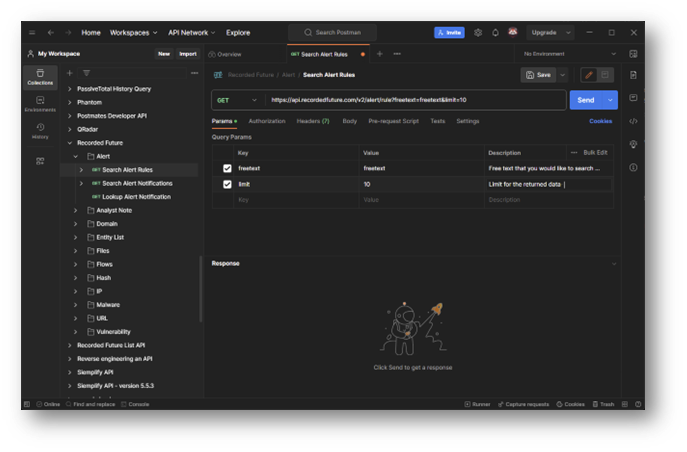
First off, I’d like to touch on the application Postman [2]. Postman is a wonderful tool that can be used to rationalize and share API calls for platforms, and also to publish and collaborate with other members of a team.
As a security professional, you’ll often have use for integrating services\platforms into processes, and APIs are key to understanding a platform’s capabilities and ultimately automating them. There are other platforms that can aid in this process, Postman is simply my preferred tool and I’ll demo some of the reasons here.
Where do I get started?
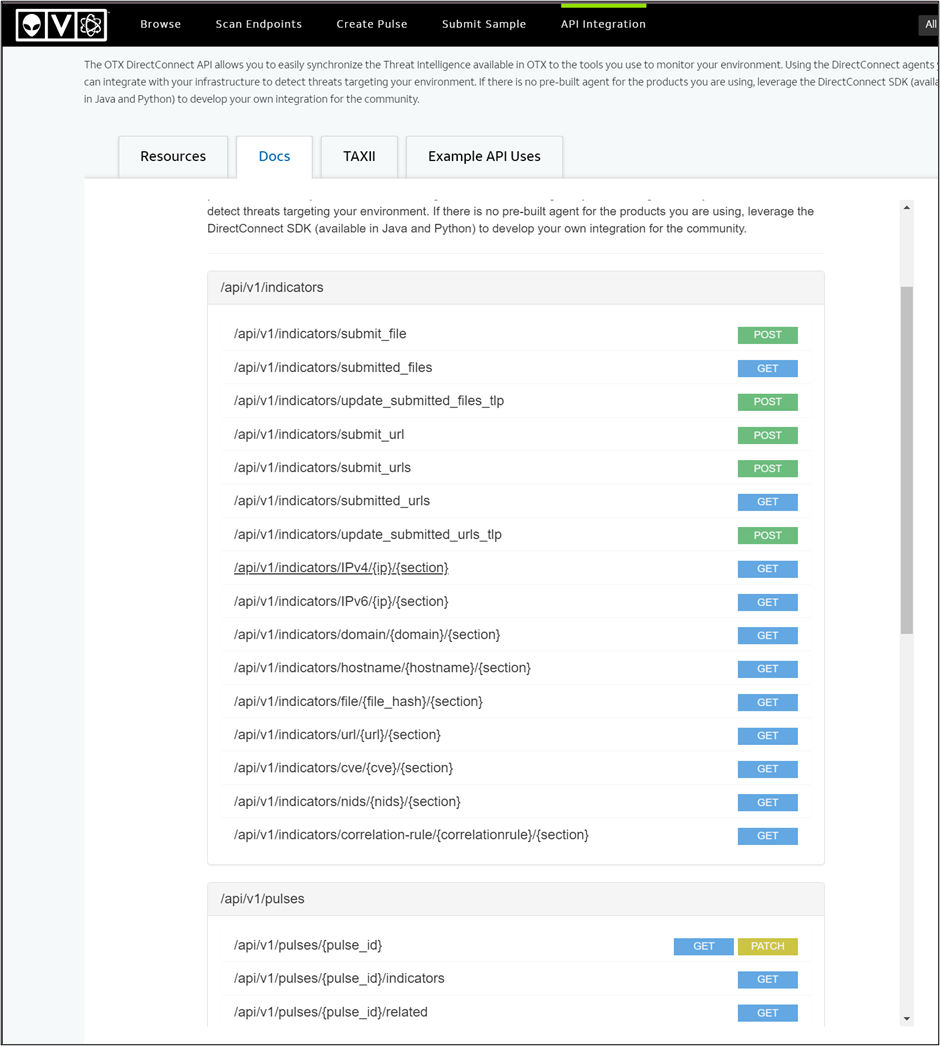
When creating a module it is good to start off with an understanding of the moving pieces in the API, as these elements will be molded into the functions for the module as “variables”. The API we’ll be working with is the AlienVault OTX platform, which allows for free sign-up and API access.
On this page there are a list of different areas of focus for the platform (domains, URLs, IP addresses, etc.) via the API and you should look over the API endpoints to come up with a series of functions that would benefit a threat hunter\security analyst via scripting.
In some cases – the service\platform provider offers a directly importable collection for Postman, which details out all of the API elements for you. This is the case with the Atlassian product Jira [4], where both the Postman collection and the OpenAPI specification are available via the documentation site:
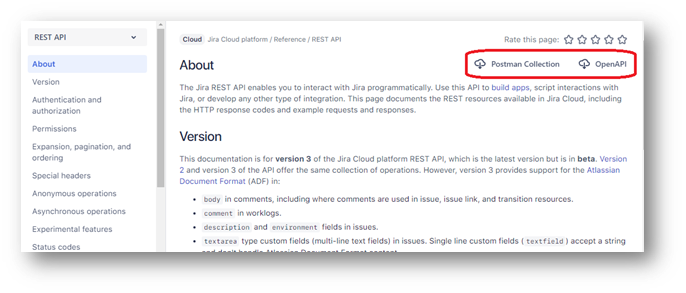
(Note: Importing collections to Postman is documented here)
How does Postman help us to use PowerShell??
Postman offers us the ability to craft the calls that we’d like to make, based off the specifications of the API, and generate code for a litany of different coding standards (PowerShell, Python, Perl, C#, etc.) – and create a wrapper in our chosen scripting language to modularize it!
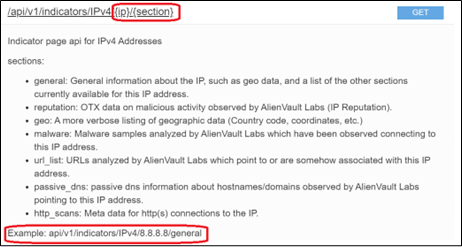
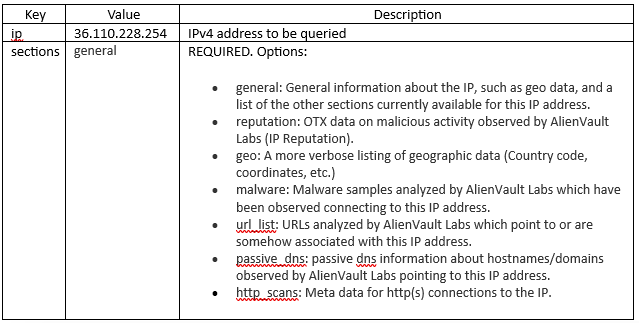
To start creating a collection & call from scratch – we’re going to the AVOTX call for looking up IP addresses (/api/v1/indicators/IPv4/{ip}/{section})
(Note: Creating an account for AVOTX is recommended, but it is not necessary to follow the concepts). Here we can see the fields that will become variables in our function for Postman (and ultimately PowerShell):
We are going to create a new API collection in Postman:
- Click “New”
- Click “Collection”
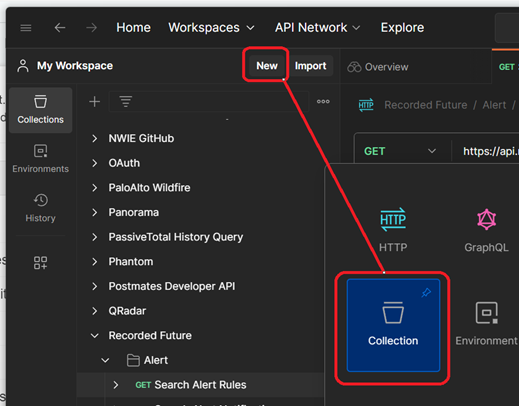
- Name the collection “AlienVault OTX”
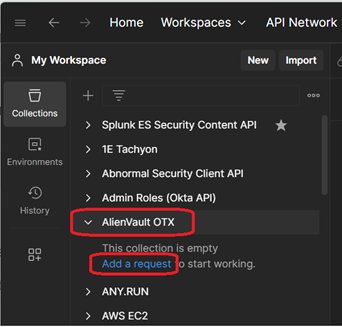
- On the left hand side, you should see the collection – Expand it using the carat at the side and click “Add a request”
- Name the request “IP Address Lookup” and hit Enter
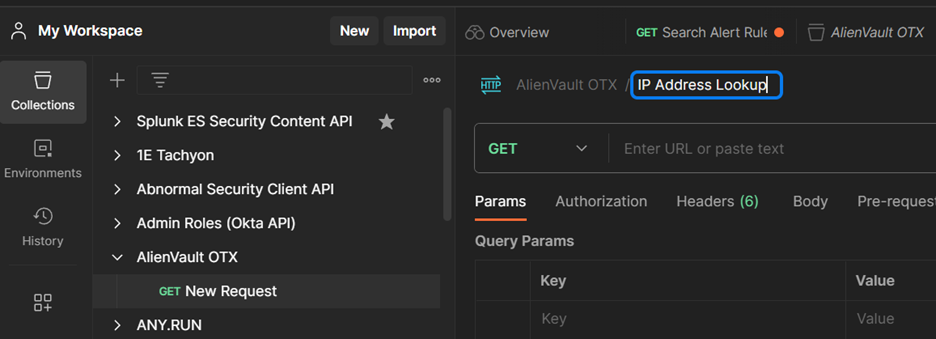
You should now have a blank canvas to start crafting your query for IP addresses!
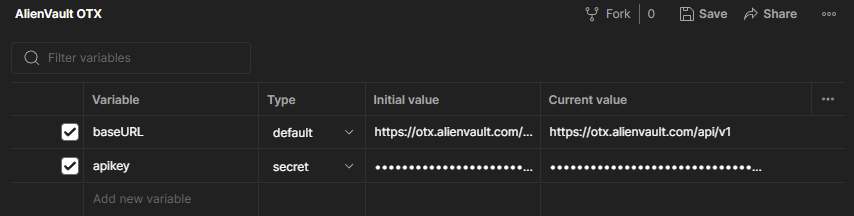
Now we’re going to set some variables both for the environment and also for the URL that we’re submitting. Click “New” -> “Environment”, name the new environment “AlienVault OTX”. We’ll need to set the following variables:

(Note: You will need to sign up for an account in order to obtain an API key, which will be visible here, and replace the “apikey” value listed above)
Click “Save”, and we can now select “AlienVault OTX” from the environment dropdown menu in the top right corner of the interface, making the variables that we set available in our requests. Creating an environment allows you to share queries without hardcoding your credentials into the collection, and also allows you to switch between DEV\PROD instances when working with APIs that might have different uses.
To place these variables we’ve created into the calls – we’ll bring our tab for “IP Address Lookup” back to the forefront, and put the following into the “Enter URL or paste text” field at the top:
{{baseURL}}/indicators/IPv4/:ip/:section
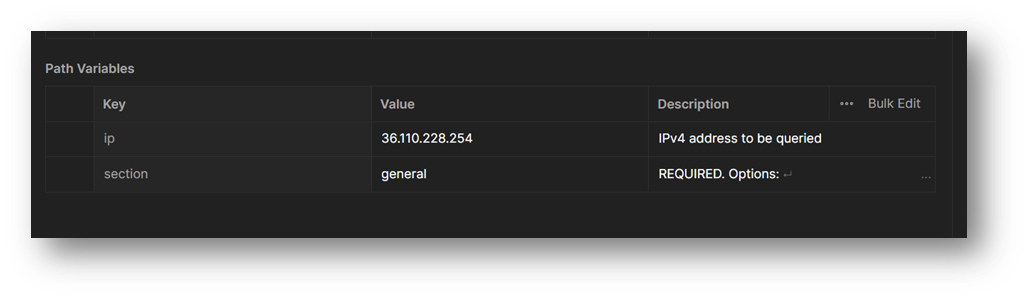
This will do a number of things. If you hover over the {{baseURL}} (case sensitive) you should see that the Postman interface recognizes it as your environment variable. The two in URL or “path variables) (ip and section) are also stubbed out below:

We need to set the values and descriptions for the variables now (IP address taken from my attack observation #3 during SANS ISC internship):
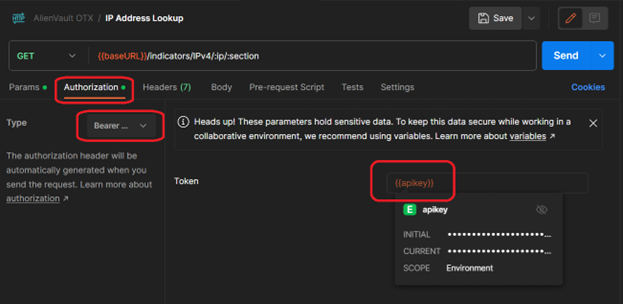
We also need to set the authentication for the call to use our API key by clicking on the “Authorization” tab, choosing the type of "Bearer Token", and setting the token value to {{apikey}} (which we set in the environment variables earlier):
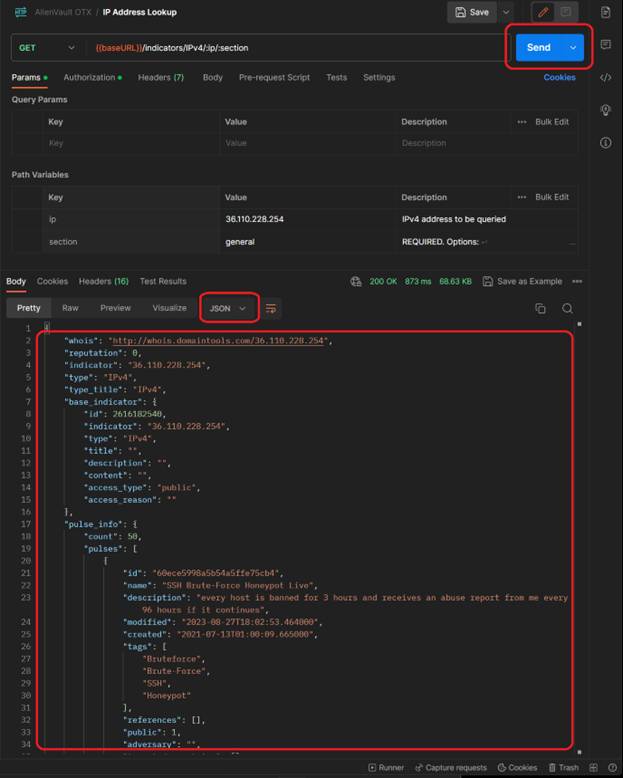
We should be all set to click on the “Send” button, and the data for the call should populate at the bottom of the screen in a JSON format (if it isn’t colorized as seen – ensure that "JSON" is selected from the depicted field:
NOW we get to the PowerShell bit. After making that call – there’s an icon on the right side of the interface for “Code” that we need to click…
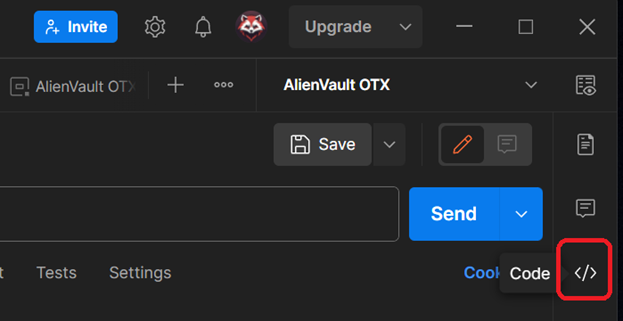
… which then brings up an interface with a dropdown menu, allowing you to select the coding model that you would like to see the call set against in a code snippet!
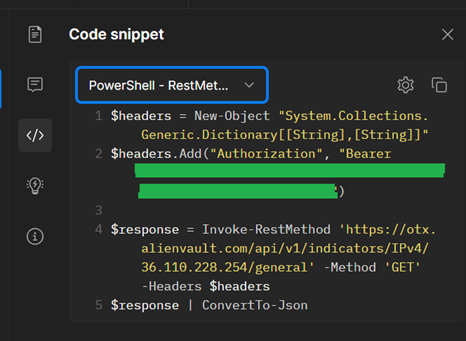
(MAJOR NOTE: We will not be going into this, as it is multiple blog posts in-and-of itself, but you will want to choose a secure way to manage and implement credentials in your scripting. Some blog posts to get you started (parts 1 & 2), and you may also want to look into secret vaulting)
I was told there would be PowerShell…
Now that we can see the formatting for how the call works against the API, we just need to craft the function and export it to a module. The API call has two functions which will be accounted for in the parameters, and an environment variable which will be called for the API key. Long term, you will want to choose a path forward for how you set this value ($avotx_apikey).
I’ve crafted the following (extremely basic\no frills) PowerShell function to wrap up the API call: https://github.com/WhatInTheShell/PublicShare/blob/main/README.md
The "IPAddress" parameter accepts an array of strings to attempt to query, and returns data associated to the submitted IPv4 addresses. A more elaborate error handling could be created for this function, taking into account elements such as…
- API call limit exhaustion
- Service being unreachable
- API key not being set (check before call)
- Etc.
… but for brevity I’m simply adding the very basics of “if not success, throw error”.
Cool… but now what do I use it for?
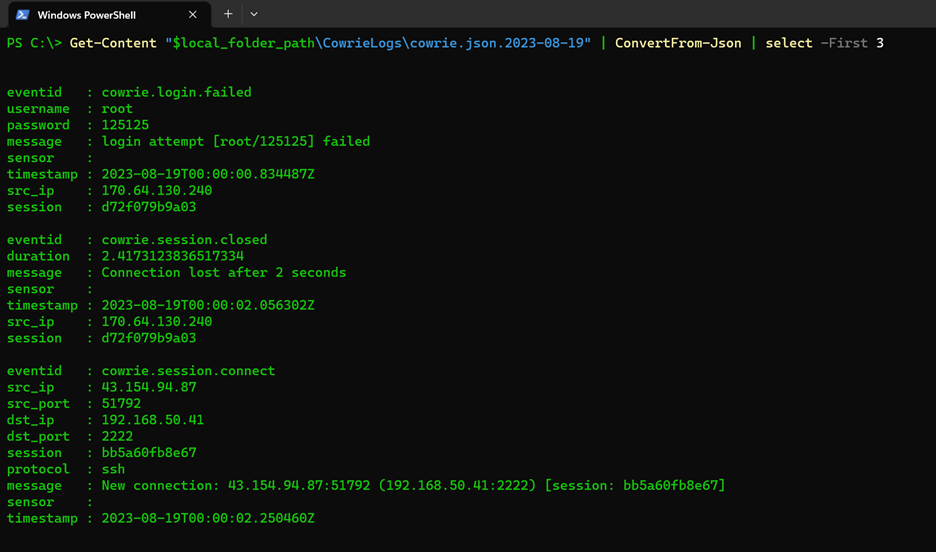
In the Cowrie logs folder for the DShield Honeypot (/srv/cowrie/var/log/cowrie), there are JSON formatted files for traffic that can be extracted from the device (or processed directly w\PowerShell Core) and used to find IP addresses that are attacking. For this you would use a combination of Get-Content & ConvertFrom-JSON:
Based off of the function that we have, the “src_ip” field is going to be of most interest to us, and we only want to submit an IP address once, so we will want to employ the Select-Object with -ExpandProperty & -Unique options set – and store the returned values as an array called $attackers:
$attackers = Get-Content "$local_folder_path\CowrieLogs\cowrie.json.2023-08-19" | ConvertFrom-Json | Select-Object -ExpandProperty src_ip -Unique
Once those values are collected and stored, gathering information on the IP addresses that are hitting your honeypot is as easy as running this oneliner:
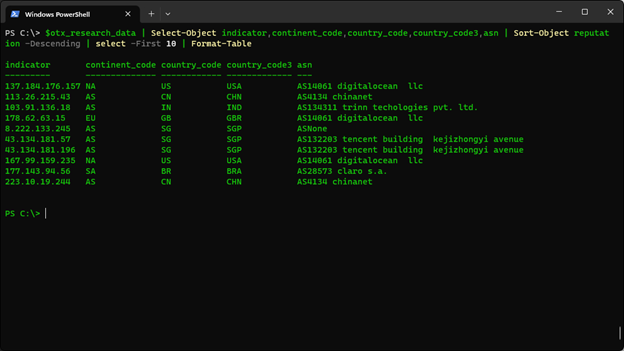
$otx_research_data = Get-OTXIPv4Data -IPAddress $attackers -Sections general -APIKey $avotx_apikey
You can now use the $otx_research_data object to group the entries by reputation, country code, recognized trends, etc. – allowing an analyst\threat researcher to prioritize what to look into. This process can be repeated and stacked with other services that are either free consumption or services your organization subscribes to.
Summary
Python is great, and this exact same process can be used in creating a Python function to get the same result. What I wanted to do was step away from the security standard go-to for scripting and show how similar goals can be achieved in an alternative fashion.
When crafting a solution, it is better to have a tool and not need it, than to need a tool and not have it. You may have associates joining your team, or working in tandem with the security department, that don’t have as much exposure\experience with one language versus another.
If you are able to show examples of something that they are familiar with, it lowers the bar of entry in adopting new approaches, implementing new automations, and increases the extensibility of solutions and partnerships.
[1] https://learn.microsoft.com/en-us/powershell/module/microsoft.powershell.core/about/about_functions?view=powershell-7.3
[2] https://www.postman.com
[3] https://otx.alienvault.com/api
[4] https://www.atlassian.com/software/jira
[5] https://developer.atlassian.com/cloud/jira/platform/rest/v3/intro/#about
[6] https://learning.postman.com/docs/getting-started/importing-and-exporting/importing-and-exporting-overview/
[7] https://www.pdq.com/blog/secure-password-with-powershell-encrypting-credentials-part-1/
[8] https://www.pdq.com/blog/secure-password-with-powershell-encrypting-credentials-part-2/
[9] https://learn.microsoft.com/en-us/powershell/utility-modules/secretmanagement/how-to/manage-secretstore?view=ps-modules
[10] https://learn.microsoft.com/en-us/powershell/scripting/install/install-ubuntu?view=powershell-7.3
[11] https://www.sans.edu/cyber-security-programs/bachelors-degree/
-----------
Guy Bruneau IPSS Inc.
My Handler Page
Twitter: GuyBruneau
gbruneau at isc dot sans dot edu


Comments