Setting up the Dshield honeypot and tcp-honeypot.py
After Johannes did his Tech Tuesday presentation last week on setting up Dshield honeypots, I thought I'd walk you through how I setup my honeypots. I like to combine the Dshield honeypot with Didier Stevens' tcp-honeypot so I can capture more suspicious traffic. Today, I'll walk you through my setup using a VM hosted by Digital Ocean, though the steps would work for pretty much any cloud provider.
I'm using Digital Ocean because you can set up a simple VM that is more than adequate as a honeypot for $5/mo. So, let's get to it.
First off, I'm going to create a new droplet (you may have to create a new project first). It is pretty straight forward.
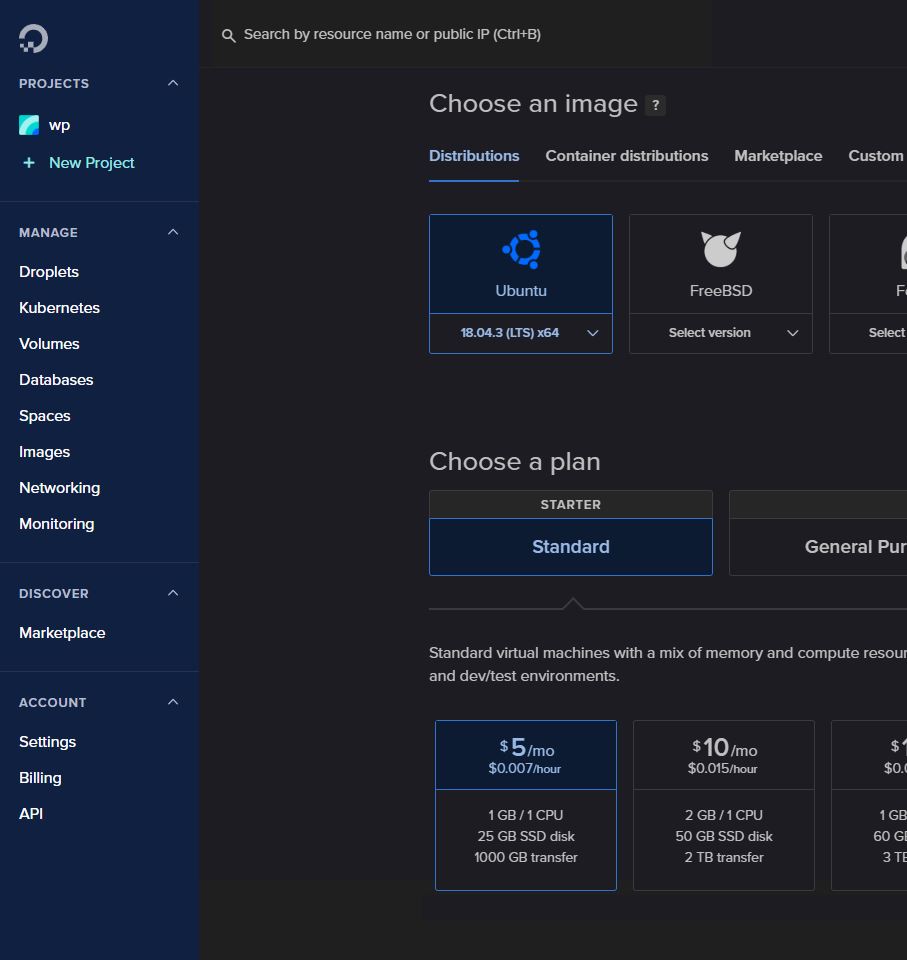 As you can see, that gets you a VM with 1 processor and 1GB of RAM, but that will be plenty. Next, you get to choose which datacenter you want this VM running in. For this exercise, I'm choosing London, but my next one might be Bangalore or Singapore or Toronto (you know how those Canadians are).
 There a few more decisions you need to make. I highly recommend that you upload an ssh public key rather than setting a root password, but once you've done all that, hit the button to create your VM and wait until it comes back with the public IP of said new VM.
Now, from wherever you intend to administer the VM from, slogin root@<ip of your VM>, and one of the first things I would do (assuming you used a public key) is to modify /etc/ssh/sshd_config and change PermitRootLogin to without-password (don't get me started on what a poor choice that was for the name for enforcing only key-based logins). From this point on, I'll mostly follow the instructions found on github for installing the Dshield honeypot on Ubuntu. Note, I can skip the step about installing openssh-server since that is already there by default. Before installing the honeypot, let's get the system current on patches
# apt update && apt full-upgrade -y && init 6
So, we're now up-to-date on patches. Personally, there are a few other things that I add now to help me administer the honeypot, like installing aide and apticron. I also tweak the settings for unattended-upgrades, and modify /etc/postfix/main.cf to set the interfaces line to loopback-only, but we have a reasonably minimal system, at this point. Next we'll get the install script from github (git is also already installed) and actually install the Dshield honeypot.

Then you can run dshield/bin/install.sh to do the actual install. A couple of things to beware of in doing the install. First, make sure you include the IP of the system from which you plan to administer the honeypot in the 'local' IPs. Trust me, I've locked myself out more than once by forgetting that, so learn from my mistakes. Then, I'm going to set this honeypot for manual update for reasons I'll explain below. Otherwise, I pretty much just take the defaults and paste in my e-mail and API key from my account page at isc.sans.edu. At this point, you actually should have a working Dshield honeypot, but as I mentioned above, I want to add another honeypot tool.
I've become a big fan of Didier Stevens' tcp-honeypot-3.py (he's going to rename it when he officially releases it sometime soon-ish, because it can also do UDP), but I'm using the 0.1.0 version from Feb 2020. He appears not to have checked into his github beta repo, so if you want to play with the version I'm using, I guess you could contact me or just wait for Didier's official release whenever that happens. I've actually made 2 minor modifications to the 0.1.0 version, the first is that I make it log to /var/log/tcp-honeypot-3/ and I've fixed the logging so that it shows src-dst rather than dst-src. The latter fix Didier has already incorporated, and I expect he'll have a way of doing the former by the time he releases.
I've also created a systemd unit file (no, I don't want to get into the religious wars about how good or awful systemd is, that's what all the Linux distros are going with, so that is what I'm using to make sure the tcp-honeypot starts up with the system). Again, I've shared it with Didier, but if you want to play with it now, I've temporarily put it up on my own github (though I will probably remove it if Didier includes it with his release), you can find it here.
So, now I have both the Dshield honeypot on tcp-honeypot on the system, but the tcp-honeypot isn't actually capturing anything. The problem is, the Dshield honeypot is controlling the iptables rules. So, we'll need to modify those rules to allow traffic through to the tcp-honeypot. The reason I set the Dshield honeypot to manual updates is that any update to the Dshield honeypot, would wipe out these updates to the iptables rules. Johannes is working on an update to allow the "local" iptables rules to persist, so at some point, I'll be able to run auto update back on. He's also working on handling IPv6, too (which the current version of the honeypot disables completely on your VM). No pressure, Johannes, now that others know you are working on it there's no pressure to get it done soon. :-)
With the systemd unit file properly placed into /etc/systemd/system/, I can run
# systemctl enable tcp-honeypot && systemctl start tcp-honeypot
Now, let's see what all is listening on my honeypot, I'll quickly run lsof -Pni and I get the following
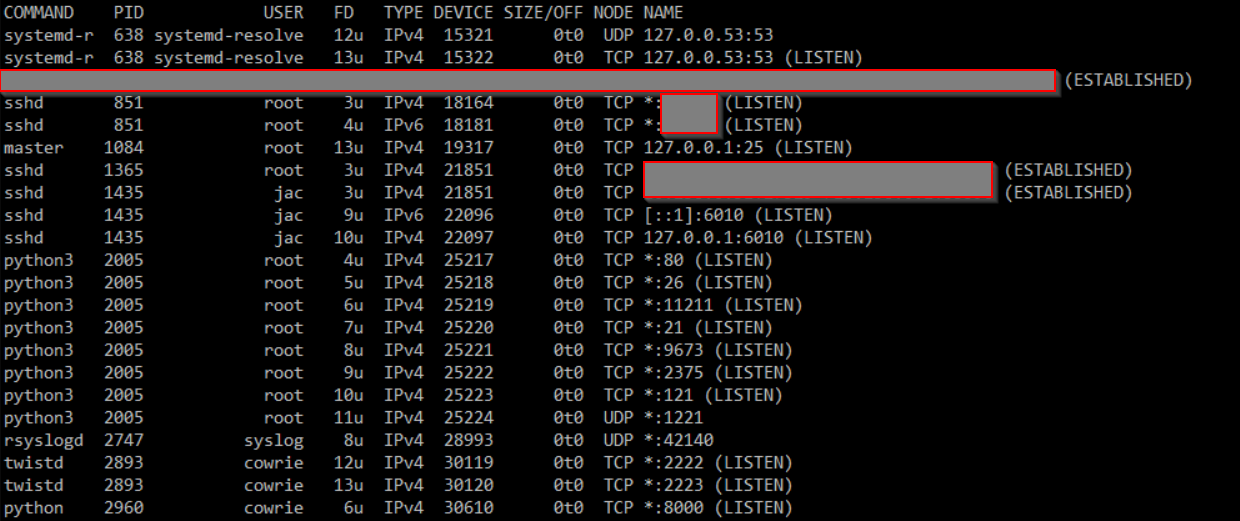 So, those python3 lines are the tcp-honeypot, the ones running as the
 cowrie user are the standard Dshield honeypot processes. I need to update the iptables rules to allow traffic through to the tcp-honeypot. I could do this in a couple of ways, but ultimately, we need to remember that the rules that the Dshield honeypot installed are located in /etc/network/iptables. So, we could modify that file, and then run iptables-restore < /etc/network/iptables. I actually chose to first run iptables-save > /etc/network/iptables, just to make sure that there was no difference between that file and what was live on the system. Then I added the 2 rules in the green box below to allow traffic through to the ports that tcp-honeypot is listening on and then ran the iptables-restore < /etc/network/iptables mentioned above. This way, I was reasonably certain I wouldn't lock myself out in the process.
 And there you have it. My honeypot is now more flexible with both the standard Dshield honeypot and Didier's tcp-honeypot. Now if I see strange spikes in traffic to unknown ports, I can have tcp-honeypot listen on that port, update the appropriate rule above (for TCP or UDP) do the
 iptables-restore and I'll have a log where I can look at that traffic and hopefully figure out what the attackers are looking for.
I hope you found this useful, if you have questions or suggestions, feel free to comment here or e-mail me.
---------------
Jim Clausing, GIAC GSE #26
jclausing --at-- isc [dot] sans (dot) edu
Elastalert with Sigma
A couple of weeks ago, Remco wrote a post about Sigma(1). I’ve also been spending a good bit of time setting up Elastalert rules with Sigma and wanted to expand on his great post. We are going to set up an elastalert rule for sigma_zeek_smb_converted_win_atsvc_task(2).
Convert Rule
Sigmac -t elastalert -c ./elastic_schema_config_file.yml /tmp/sigma/rules/sigma_zeek_smb_converted_win_atsvc_task >>/etc/elastalert/rules/sigma_zeek_smb_converted_win_atsvc_task.yml
Let's see what this rule is doing
This rule is looking at the bro_smb_files events where IPC$ and atsvc show up.
alert:
- debug
description: Detects remote task creation via at.exe or API interacting with ATSVC namedpipe
filter:
- query:
query_string:
query: (event_type:"bro_smb_files" AND path.keyword:\\*\\IPC$ AND name:"atsvc")
index: '*:logstash-bro-*'
name: f6de6525-4509-495a-8a82-1f8b0ed73a00_0
priority: 3
realert:
minutes: 0
type: any
query_key: ["source_ip", "destination_ip"]
Test it
On Security onion they have a command builtin called so-elastalert-test.
#sudo so-elastalert-test -r /etc/elastalert/rules/sigma_zeek_smb_converted_win_atsvc_task.yml
1. Is the query running too slow?
2. Is it looking at the right data?
3. Are the results as expected?
elastalert_status - {'rule_name': '66a0bdc6-ee04-441a-9125-99d2eb547942_0', 'endtime': datetime.datetime(2020, 5, 29, 14, 51, 13, 474764, tzinfo=tzutc()), 'starttime': datetime.datetime(2020, 5, 28, 14, 51, 13, 474764, tzinfo=tzutc()), 'matches': 0, 'hits': 183990, '@timestamp': datetime.datetime(2020, 5, 29, 14, 53, 2, 609529, tzinfo=tzutc()), 'time_taken': 109.09370565414429}
If you are not getting any hits for the rule, expand the search to see if you have any true/false positives. On security onion manually, call the rule test and use the --days option.
#docker exec -it so-elastalert bash -c ‘elastalert-test-rule /etc/elastalert/rules/sigma_zeek_smb_converted_win_atsvc_task.yml --days 25’
You may have false positives from your administrator's desktops talking to other systems, and you will need to adjust the alert to not match on these IP’s. Once you are happy with the results, we need to add it to our alert/IR platform. In this case, we are going to send it to TheHive.
At the bottom of sigma_zeek_smb_converted_win_atsvc_task.yml you want to add TheHive config. The MITRE Tags are not being transferred to the elastalert rule, and we’ll add them manually.
===
hive_connection:
hive_host: https://ip
hive_port: 9443
hive_apikey:key
hive_alert_config:
title: ' Sigma Remote Task Creation via ATSVC Named Pipe {match[source_ip]} -- {match[destination_ip]}'
type: 'alarm'
source: 'Sigma'
description: 'Alert : {match[source_ip]}
severity:2
tags: ['elastalert', 'attack.lateral_movement', 'attack.persistence', 'attack.t1053','car.2013-05-004','car.2015-04-001', 'sigma']
tlp: 1
status: 'New'
follow: True
sourceRef: '{match[source_ip]}{match[destination_ip]}'
hive_observable_data_mapping:
- ip: '{match[source_ip]}'
- ip: '{match[destination_ip]}'
===
Now restart elastalert service and you should start getting alerts on any of these matches.
#so-elastalert-restart
(1)https://isc.sans.edu/diary/rss/26258


Comments